Using the Tools to Teach the Tools: Teaching Multimedia Programming in Music Curricula

Alexander R. Brinkman and Elizabeth W. Marvin
KEYWORDS: multimedia, HyperCard, CAI, cognition, pedagogy
ABSTRACT: The Eastman School of Music is engaged in a school-wide initiative to broaden the scope of traditional music education, and to build new audiences for art music in future generations. As part of this endeavor, students in a new technology course are learning to experience and teach music in a new way through the power of multimedia computing. Students learn to create interactive multimedia applications on Macintosh computers that combine color graphics, scanned images, video, sound files, MIDI synthesizer, music notation, and tracks from commercial compact discs into a teaching environment for their own students. This essay describes the syllabus, teaching methods, and materials used in the course, and demonstrates sample student projects.
EDITORIAL NOTE: Professor Brinkman chairs the SMT Networking Operations Committee; Professor Marvin is on the SMT Executive Board and Professional Development Committee
Copyright © 1997 Society for Music Theory
A Note About the Figures
[HyperCard was not designed for presentation on the Web, although facilities for doing this easily are promised in the next major release. While there are programs that convert HyperCard stacks for web use, many of the stacks shown here utilize commercial or custom-made CDs and external commands for the Macintosh, making them impractical for web presentation without a great deal of rewriting. We have compromised by showing individual cards as GIF images and portions of programs as QuickTime movies. This does not allow user interaction, but does demonstrate the programs. The GIF images were created from screen shots made via a keyboard shortcut on the Macintosh. These were then cropped and converted with GIFConverter 2.3.7. QuickTime movies were made using CameraMan 3.0 (Motion Works), which records movies directly from the computer screen. CameraMan does not record the cursor on PowerMacs, so wherever possible, we modified buttons and fields so that they would be highlighted when the user clicks on them with the mouse. Many of our stacks use a large-screen format which does not fit well into web browsers. Movies of these were reduced to half size resulting in some loss of definition, especially in text. Where higher definition was necessary, we recorded partial windows, so the whole card does not show. We used SoundEdit 16, version 2 to reduce all sound tracks to 22.05 kHz, 8 bit, mono to keep size to a minimum. Figures are shown in separate windows, which should be closed after viewing each figure. We have provided a button, implemented in JavaScript, at the bottom of each figure for this purpose, or you may use the normal close box or pull-down menu, depending on which browser you are using.
In the text-only version, figures that are text based are shown in full
through linked pages. When GIF images or QuickTime movies are involved,
we list the figure name below the paragraph in which it is mentioned and
give the name of the file (in case the reader is able to download and view
them). Where necessary, a short description of the picture or movie is included.
A prose description of multimedia is a poor substitute for the real thing;
PLEASE read this article online with a full graphic browser if at all possible.]
1. Introduction
2. Using the Tools to Teach the Tools
3. Software Review--an Online Journal
4. Getting Started
5. Teaching HyperTalk Programming
6. Using External Commands
7. Implementing Music-Cognition Experiments
8. Student Projects
9. Future Directions
1. INTRODUCTION (TOC)
[1.1] In 1994 the authors were asked to design a new course in Multimedia Programming to be offered by the Theory Department at the Eastman School of Music. The course was to have two primary objectives—to acquaint students with techniques for using multimedia computing in instructional settings, and to develop techniques to be used in music-cognitive research. The course, entitled “Computing for Pedagogical and Cognitive Research Applications” was offered for the first time in the spring of 1995, and is now offered each spring semester. We chose HyperCard as a programming environment because the course was initially offered with minimal financial and technical support. Although Macromedia Director was already becoming popular, it was expensive and academic discounts were not available at the time. At about $85 per copy, HyperCard could be put on each of the four computers we had available for the course, and students could purchase it for use at home, thus extending our minimal resources.
[1.2] The course, which is required for our MA Theory Pedagogy degree and recommended for the Pedagogy and Cognition track in our Ph.D. program, is available as an elective in other tracks in our Ph.D. program. It can fulfill one theory requirement for graduate students in other degree programs and can be taken for credit by upper-level undergraduate students with permission of the instructors.
[1.3] This course complements several other courses offered at Eastman that involve computers. The Theory Department also offers Brinkman’s two-semester programming course (Computer Applications in Music), and independent study courses for students who want to do more in-depth work. Dave Headlam’s courses in acoustics, research methods, and web page design all have an important computer component. The Composition Department offers several courses in computer music synthesis, including an undergraduate introduction, and a two-semester sequence for graduate students. The Music Education Department offers their students training in use of synthesizers and MIDI, and Jazz and Contemporary Media offers courses in film scoring, recording techniques, and studio production techniques. As part of the Eastman Initiatives program, many courses will be expanded to include a technology component. For example, in the Theory Department we are moving toward putting many course materials on the web, and we are planning a technology component in our undergraduate core curriculum that will include the mandatory use of music notation software, MIDI, CD-ROM browsing, and web usage.
[1.4] When we began the course, we did not have access to a well- equipped computer lab. Sibley Music Library provided a room for teaching, and we were able to borrow an overhead projector with a display device. The school provided the teaching station, a Power Macintosh 6100 with MIDI keyboard and interface, three computers for student use, and a limited budget for purchasing software. We were fortunate that Sibley Library already had a good selection of CD-ROM media applications, and was extremely helpful in purchasing additional applications for their collection that would also serve as good teaching examples. The library also made available space for the student computers in their listening room for viewing applications and preparing homework assignments.
Figure 1. Course Syllabus
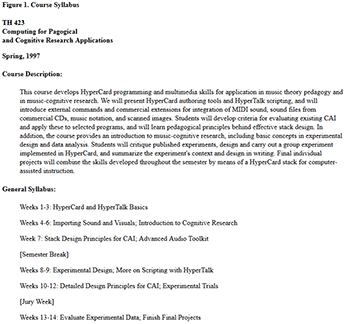
(click to enlarge and see the rest)
[1.5] During the one-semester course, students review commercial software packages (both CD-ROMs and CAI packages for ear training and theory instruction), design and run a music-cognitive experiment that is completely implemented in HyperCard, and create an individual final project in HyperCard. Final projects vary from music theory tutorials, to ear training drill-and- practice, to repertoire-based CD “companions.” Students are also required to complete smaller assignments to acquire HyperCard authoring and scripting skills. The syllabus for the course for the Spring 1997 semester is shown in Figure 1.
[1.6] We have used several different texts in teaching the course in addition to the manuals that come with HyperCard. We have found Beekman, HyperCard 2.3 in a Hurry (1996) to be a terrific way to get students started in multimedia quickly. The first year we had students buy Desberg, HyperInterActive CAI (1994), which comes with a large set of example stacks. Although Desberg’s treatment of educational philosophy and design were very helpful, the stacks contain many errors and we often ended up using them as counter-examples of good design. After the first year we put a copy of this text on reserve in the library but did not have the students purchase it. Danny Goodman’s The Complete HyperCard 2.2 Handbook (1993) is the primary scripting source. His practice of asking the reader to test commands interactively in HyperCard’s “message box” is an excellent pedagogical methodology, and his approach to presenting HyperCard and HyperTalk is accessible and thorough. Finally, HyperTalk 2.2, The Book, by Winkler, et. al. (1994) contains a wealth of excellent examples illustrating HyperTalk programming techniques, and was invaluable as a reference for the instructors. Students’ references for the cognition portion of the course include David Butler, The Musician’s Guide to Perception and Cognition (1992), Ray and Ravizza, Methods Toward a Science of Behavior and Experience (1998) and Cozby, Methods in Behavioral Research (1993).
[1.7] HyperCard was the first generally available tool for developing multimedia applications. Its design metaphor is a stack of cards, each of which may contain text fields, buttons, pull-down menus, graphics, and so on. Buttons, fields, portions of text, and even cards can be programmed so that clicking on them with the computer’s mouse causes some action to occur—moving to a new card, playing music, viewing a movie, viewing hidden text, etc. Stack design often provides for nonlinear access—that is, the cards do not have to be accessed in a specific order. For example, clicking on an item in a Table of Contents card can take the user directly to the specified section of the stack; clicking on highlighted words (“hot text”) might take the reader to a glossary with a definition of that text or to another section of the stack that explains a related concept. A diagram might be covered with invisible buttons, programmed so that clicking on a specific location will transport the user to another card with related information, graphics, or sound. Often, at least within sections, linear navigation is also possible by clicking on buttons—typically right or left arrows—to move to the next or previous card in the sequence. Thus both linear and nonlinear learning styles can be accommodated within the same stack. The integration of graphic representations, explanatory text, sound files of musical excerpts or spoken narrative, and movies allow the learner to explore a topic through many learning modalities.
[1.8] HyperCard has five user levels: Browsing, Typing, Painting, Authoring, and Scripting. In the Browsing level, the user can explore (or navigate) through stacks but cannot make any changes in them. The Typing level allows the user to enter and edit text in fields. The next level allows users to use Paint tools to change the appearance of cards and backgrounds. The Authoring level allows users to add new cards, add buttons and fields and change their appearance, link buttons to other cards, add transition effects, etc.—all through the use of menus and mouse clicks. In this level, HyperCard automates the creation of HyperTalk “handlers” that cause appropriate actions. The Scripting level allows the user to program HyperCard in its native programming language, HyperTalk.
2. USING THE TOOLS TO TEACH THE TOOLS (TOC)
[2.1] While planning the course, we decided to use multimedia techniques in our teaching wherever possible, and devised a pedagogical method we call “Using the Tools to Teach the Tools.” This had several advantages in a course such as this: 1) it provided immediate examples of the utility of the methods we were teaching; 2) it facilitated the instructors’ rapid development of skills with the programming techniques they would be teaching; 3) the programs developed would serve as study examples later in the course when they were learning to program in HyperTalk.
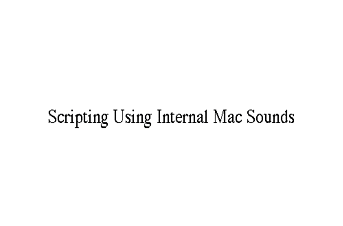
Figure 2. Bullet Lecture: Internal Sounds Demo
(click to watch video)
Figure 3. Portion of Stack from SMT Presentation (reduced to half size)
(click to watch video)
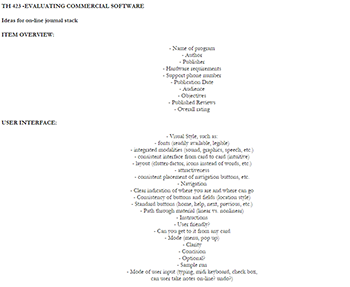
Figure 4. Evaluation of Software (Class Outline)
(click to enlarge and see the rest)
Figure 5. Online Journal
(click to watch video)
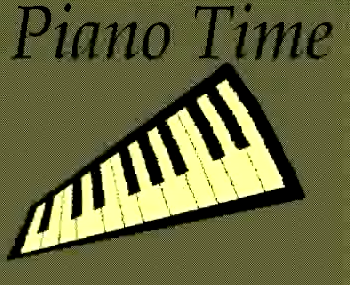
Figure 6. A Student Project (Opening Sequence, half size)
(click to watch video)
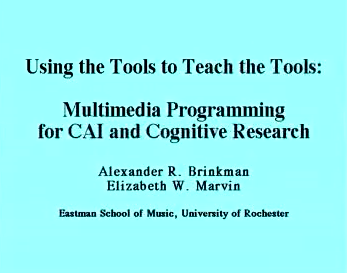
[2.2] The first of our “teaching tools” was a HyperCard stack we called a “bullet template.” It was motivated by the authors’ aversion to lectures in which the presenters put up transparencies covered with paper so the audience can see only the point currently being discussed. Instead, our stack uses bullet paragraphs with “fields” for adding text. The presenter alternately shows or hides the text by clicking on the bullet, and can move drag bullets to different positions for page formatting. Menu items are provided for hiding or showing all of the text on a card and for aligning the text. A button on the bottom of the page unlocks and locks the text fields so that they can be modified. Scripted buttons can be added to the card for going to other cards or other HyperCard applications, or scripts can be added to the fields, so that clicking on the text causes some action to be taken. Figure 2 is an example of a class presentation on HyperCard’s internal sounds. We have used this device for preparing many class lectures, and in a larger format, with color added, to do presentations at conferences. Figure 3 is a portion of the stack we used for our presentation at the 1996 SMT Conference. Many buttons in this stack are linked to other stacks, so the whole presentation can be made from one program. (Here, the QuickTime movie is reduced to half size to fit in web browsers.) Our lecture notes are provided in this format for our students on each of the lab computers, and more advanced students can study the programming used to implement the stack as well. Other examples of our pedagogical tools—an online journal and computer-implemented music cognition experiments—are discussed below.
3. SOFTWARE REVIEW—AN ONLINE JOURNAL (TOC)
[3.1] A review of commercial instructional products serves two pedagogical purposes. First, it familiarizes students with the applications that are available, which will serve them well in future teaching positions. Second, students are encouraged to make notes on features they like, don’t like, or could be improved upon. This suggests techniques they might implement in their own final projects.
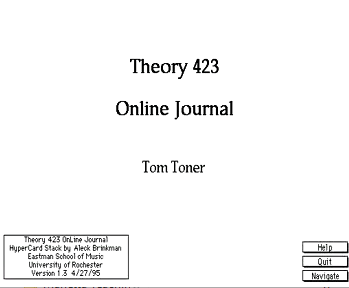
[3.2] In keeping with “teaching tools” philosophy, we designed an Online Journal for the students’ use. The first time we taught the course we developed criteria for software evaluation in class discussion after reading Desberg’s chapters on software design and evaluation. The outline designed by the class is shown in Figure 4. Using this as a starting point, Brinkman wrote a HyperCard Stack for use in the review process. The journal template consists of a blank title card, one card for a review, and a help card. New review cards are added by the student as needed. Each review card has fields for the title, reviewer, date, and author, and radio buttons for indicating the software type (Tutorial, Drill and Practice, Game, or Simulation). In addition, students click on buttons to specify an overall rating of the program (1 to 5 in increments of .5). Buttons are provided for accessing text fields for describing Publication Information, System Requirements, Overview, Visual Style, Navigation, Instructions, General Discussion, Content, and Other). Clicking on each button causes a pop-up field to cover the card, with the button name as a title bar. Scrolling fields are used so that as much information as needed can be entered. The student can see an outline of what should be included in the field by shift-clicking on the title bar. A pull-down menu allows the user to print a single entry or the whole journal, or to save entries as a text file that can be imported into other word processing programs. Students are encouraged to do a thorough and thoughtful review of each of their chosen software packages—not simply to report what is there but to evaluate the content and its utility for various audiences, the implementation, and user interface. Students can have the journal stack open at the same time as the applications they are reviewing, so they can flip back and forth. An example of this stack, by Tom Toner (a D.M.A. percussion student), is shown in Figure 5. The first year, we had students review five products, but subsequent years we cut back to three to allow additional time for development of their final projects. Each student is also required to do a one-page summary of one or two programs to share with the class.
4. GETTING STARTED (TOC)
[4.1] Each year, we begin the class by showing some of the best final projects from previous classes. Figure 6 shows the opening sequence from one such project by Jon Hynes, a D.M.A. piano student. (Others are shown in section 8 of this essay.) This demonstration gives the students a good idea of where the course is headed and helps to set high expectations for their own final projects. Although we have had some excellent projects from each class, this practice (along with our increasing experience in teaching the material) has helped to raise the overall quality of final projects each year we have taught the course. Next we introduce students to HyperCard in a Hurry (Beekman), which is designed as seven “sessions” that progress logically through HyperCard’s user levels, from Browsing through simple Scripting. The last unit introduces color tools (which were not available in early versions of HyperCard) and discusses various “external commands” for controlling external devices, synthesizing speech, and controlling QuickTime movies. Recently we have introduced color tools much earlier in the course rather than waiting or Beekman’s final session.
[4.2] Each of Beekman’s units leads students through detailed steps to create a working HyperCard stack. This learn-by-doing pedagogy provides an effective and fast introduction. From the start, we supplement these exercises with readings in Goodman for more detailed information, and often have the students do a second version of the assignment that is much more complete and adds various “bells and whistles,” or that makes the project more meaningful. For example, Session 2 “The Dynamic File Cabinet: Information Storage and Retrieval,” teaches students to use an “Address Book” stack that comes with HyperCard, and then teaches the reader how to increase the user level, get into the “background” of a card, delete or copy fields and buttons, and add labels to fields. We supplement this lesson by giving detailed instructions for modifying the stack to make a custom “Discography” for cataloguing their recordings. This new version of the stack requires the students to change field names, add new fields and buttons, and write a simple button script.
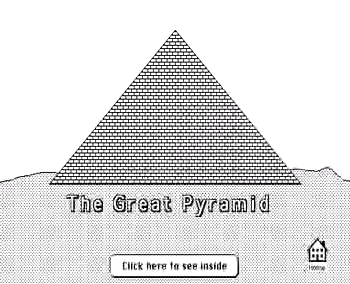
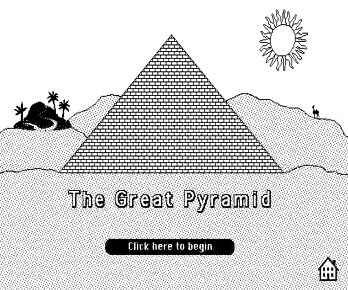
[4.3] Beekman’s Session 3 teaches the Authoring level of HyperCard and Paint tools, through the creation of a stack that illustrates an Egyptian pyramid, with buttons that allow the user to “enter” one of the chambers and then to return to the diagram of the pyramid. We teach the students how to add “clip art” and how to add scripts to play music using HyperCard’s built-in sounds. Students then create a second version of the Pyramid stack that is more ornate, illustrates each room of the pyramid, and adds traveling music while changing cards. Figure 7 shows the version created following Beekman’s instructions. Figure 8 is the much more creative version done by Kristin Tait, a D.M.A. percussion student, who provided for direct navigation between the pyramid “map” and individual rooms or for a “tour” of the pyramid via clicking on an asp to move from room to room. Tait also made good use of perspective in designing the various rooms. Beekman’s instructions result in nearly identical student stacks, while our modified assignments provide a vehicle for student individuality and creativity. We always have a stimulating class session showing different versions of these assignments; the presentation also provides an opportunity to critique design decisions made by the students. In general, we require students to do the basic assignment as an ungraded exercise, and then collect and grade the extended creative version.
|
Figure 7. Beekman’s Pyramid
(click to watch video) |
Figure 8. Student Pyramid with Sound, Clip Art, and Perspective
(click to watch video) |
5. TEACHING HYPERTALK PROGRAMMING (TOC)
Figure 9. Scripting Assignment 1
(click to enlarge and see the rest)
Figure 10. A Student Solution to Scripting Assignment 1
(click to watch video)
Figure 11. Theory 423 Scripting Assignment #2
(click to enlarge and see the rest)
Figure 12. A Student Solution to Scripting Assignment 2
(click to watch video)
Figure 13. Butler Example Assignment
(click to watch video)
[5.1] While users can create useful and even impressive stacks without ever doing any programming, learning the scripting language behind HyperCard empowers them to do many things that would otherwise be impossible, such as storing information about students and their progress (in CAI), controlling external devices using external commands, and creating applications that would be impossible without the finer level of control that scripting provides. Finding the correct balance is difficult, because some of the students in our multimedia class have already taken Brinkman’s two-semester programming course, some are experienced programmers, and some have never used a computer for anything more demanding than word processing. We begin laying the groundwork early—during the first or second class—by teaching students how to “peek” at the scripts in buttons to see how the task is actually done, and to introduce the elemental concepts of object oriented programming. For example, after they have used the automated tools to link a button to a card, we encourage them to look at the “handler” (procedure) in the button script, something like:
       on mouseUp
         go to card id 1045
       end mouseUp
Even at this early stage, we explain that clicking the mouse sends a “mouseDown” message through the system; releasing the mouse sends a “mouseUp” message, which causes the on-screen button to perform the action: go to the specified card.
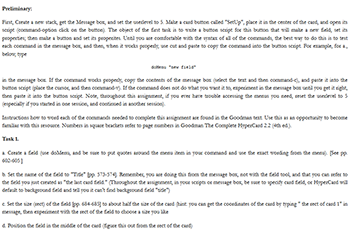
[5.2] We introduce other messages and discuss message passing hierarchies (precedence) and more arcane topics a bit later. Generally we introduce new concepts with a “bullet lecture” and give related reading assignments in Goodman, provide a handout summarizing the techniques, and do in-class demonstrations by typing commands into the message box or writing handlers to illustrate techniques. If we have prepared a longer demonstration, the stacks are left on computers where the students can study them. We also discuss the scripts in class and give students a paper copy that they can study at home. We have designed a series of “scripting” assignments that teach the basics of programming to the novice, but encourage more advanced students to extend the exercises. As a first scripting exercise, we discuss button and field properties. Students are already familiar with some of these from setting them with menus. We provide a handout listing all of the properties of buttons and fields, explain how to set these properties in HyperTalk, do some in-class illustration and experimentation, and then give them an assignment which forces them to master the concepts. Figure 9 is a listing of the first assignment; Figure 10 shows a solution by Jocelyn Neal (a Ph.D. theory student). This student’s solution features music-related quotes from Hugo, Wagner, Stravinsky, Congreve, Heine, and Thoreau. Clicking on the author’s name highlights the appropriate text, and other buttons display the sources and dates. The stack also makes good use of Art Deco borders provided as resources by HyperCard.
[5.3] After teaching control structures (if .. then .. else) and various forms of loops (repeat until, repeat with, repeat while, etc.), we give another assignment in which students use simple arithmetic and control structures to move buttons from one place on the screen to another. Figure 11 shows the assignment; Figure 12 again shows a student solution.
[5.4] Some students, especially those with no programming background, find these assignments difficult and need some assistance to complete them, but most become fairly comfortable with writing or modifying handlers by the end of the course, and some of the more experienced students do some remarkable programming for their final projects.
[5.5] A later scripting assignment deals with using the clickLine, a HyperTalk function that identifies the line number and field name of the last field the user clicks on. Once students have learned how to write handlers and use some external commands, this function can be used in many different ways, e.g., building a table of contents linked to other cards, or building a form chart that plays the appropriate passage from a CD when the user clicks on a form label. These techniques are demonstrated in Section 8 in many of the final projects.
6. USING EXTERNAL COMMANDS (TOC)
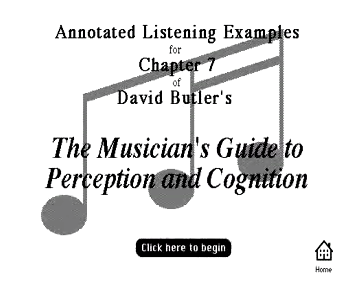
[6.1] Many extensions to HyperCard are available in the form of external commands—utility programs written in high-level programming languages such as C or C++. These commands can be called from HyperCard to control devices such as MIDI synthesizers and CD players. We incorporate several of these in our course. Voyager’s CD Audio Toolkit provides tools for indexing and accessing music on compact disks. We introduce this early in the course during our unit on music cognition and perception. After reading several chapters in David Butler’s The Musician’s Guide to Perception and Cognition, the students are given an introduction to the Voyager toolkit, and use it to make buttons that play musical examples from Butler’s CD. In a follow-up assignment, they import music notation for the examples, and design a stack that displays the examples with explanation, and plays the musical excerpts from the CD. This exercise provides practice in presenting material in a multimedia format, as well as in using the Voyager tools and a music notation package. A solution by Jeff Markarian, a Ph.D. theory student, is shown in Figure 13.
[6.2] The Voyager toolkit is also invaluable for its many examples of scripts for doing different types of tasks with music CDs, written using their external commands. As a simple example, the command “CDPlay 00,01,15,02,22,45” plays a segment of a compact disk in the computer’s CD drive. The command specifies the starting time and ending time of the segment in minutes, seconds, and frames (75 per second), measured from the beginning of the CD. Commands like this can be placed in scripts in buttons, fields, backgrounds, and cards to control the CD player. Later in the course, after students have had more HyperTalk programming experience, we study some of the more elaborate scripts, such as those that link a succession of cards to a CD passage or that highlight measures in music notation as a CD passage plays. We provide handouts with details of the Voyager external commands and functions with examples of their use; many students use these tools in their final projects.
[6.3] We also introduce and demonstrate other external commands. Although time has not permitted formal assignments using these, demonstration stacks and manuals are available, and we help students to use them in their final projects if they are needed. We have used two packages for controlling MIDI—Opcode’s MIDIplay, and Earlevel’s HyperMidi. Midiplay is no longer actively supported, but it is available from Opcode’s educational contact, and we have used it in implementing cognition experiments (see below). One of our previous students, John Clevenger (a Ph.D. theory student), is using HyperMidi with HyperCard to develop an ear-training package that is quite impressive.
[6.4] We also introduce QuickTime movies through Apple’s QuickTime Tools, distributed with HyperCard. These powerful tools make it easy to add movies to stacks, but are also useful for playing MIDI files and sound files. One can either display a QuickTime controller on a card or, using the Advanced Tools and some scripting, control the files from scripts without showing the controller.
7. IMPLEMENTING MUSIC-COGNITION EXPERIMENTS (TOC)
[7.1] Each time we have taught the course, we have included a cognition experiment as part of the course design. We introduce the cognition component early through readings in Butler and the Voyager CD Audio Toolkit assignment. Later we teach a unit on experimental design, including readings carefully chosen by Marvin to lay the groundwork for our experiment. Then, as a class project, we design, implement, and carry out an experiment. Marvin proposes the topic, which is refined and developed through class discussion, and students help to locate and prepare appropriate musical stimuli. Then, while students are working on their final projects, Brinkman works on his: implementing the experiment in HyperCard. Students in the class recruit friends and classmates to participate as subjects and help to administer the experiment by overseeing participant sessions. (With a student body of roughly 800 undergraduate and graduate students, Eastman is a wonderful place for finding participants.) Students in the course are given an introduction to APA (American Psychological Association) style and each write the first part of a paper on the experiment, describing the hypothesis and method, but omitting the section on results and analysis. The instructors do a preliminary analysis of the data using Statview; we present preliminary findings to the class late in the semester. After the term is over, we do a more leisurely and thorough analysis of the data to prepare papers for eventual conference presentation and publication, with due credit given to our students who participated in running the experiment.
[7.2] There are many advantages to the computer implementation. If the program is designed well, the subjects can participate with little outside intervention, although we always have a class member or instructor available to answer questions if necessary. The computer is used for all aspects of the experiment—it gives instructions, collects data on the participants, presents practice problems, administers a pretest, presents the stimuli, and collects data on responses. Our programs randomly generate a different stimulus order for each subject, eliminating learning effects as a “confound.” HyperCard can measure subjects’ response times to a 60th of a second without adding any extra data- collection hardware. All data are saved to the hard disk in text files as comma-separated lists that import easily into Excel and Statview. The greatest advantage of the computer implementation is the amount of information, both about the subjects and about the stimuli, that we can embed in these files. We can massage the data in many ways, and perform statistical analysis of the interaction between many different factors, and we avoid the drudgery and chance of introducing errors associated with manual transcription of subject responses.
Figure 14. Cognition Experiment: Collecting Data
(click to watch video)
Figure 15. Cognition Experiment: User Interface 1
(click to watch video)
Figure 16. Cognition Experiment: User Interface 2
(click to watch video)
[7.3] We have implemented three experiments to date, one having to do with differences in tonic perception by absolute-pitch (AP) and relative-pitch (RP) listeners, and two on perception of tonal closure by trained musicians. Space does not permit a detailed discussion of our hypotheses and results—these will be published elsewhere. Here, we will concentrate on the computer implementation.
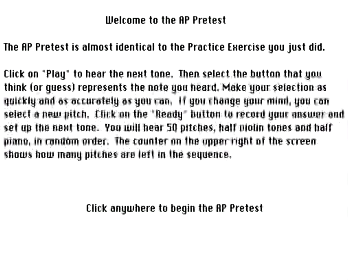
[7.4] In the first part of an experiment session, we collect data about the subjects, their age, sex, primary instrument, academic discipline, number of years of training, etc. Although some questions vary from experiment to experiment, the method of collecting the data is similar, using a combination of check boxes and dialog boxes. Before going on, the participant is shown a summary of the data. Clicking on any item with the mouse allows the subject to go back and change an answer. This portion of an experiment is shown in Figure 14.
[7.5] Each of our experiments to date has included a “pretest” to see to what degree the subject possesses “absolute pitch” (AP). In the first experiment, we used both AP and RP subjects, and needed to track response times for each stimulus. We designed an interface with note names arranged in a circle around a central “Play” button, so that each response would be equidistant from “Play.” The subject clicks on “Play,” listens to the stimulus, and then clicks on one of buttons to identify the pitch (or tonic, in the actual experiment). Subjects could change their answers by clicking on different buttons. When they click on central button, which has changed to “Ready,” their answers are recorded. We trained subjects to use the interface through a practice round in which the user clicked on buttons that were randomly selected by the computer until they could perform the task consistently in under a second. In a second practice round, pitches were played and the subjects selected the notes they thought they heard. The actual pretest followed the same format, except that many more pitches were given (in random order). The computer recorded the actual note played, the subject’s answer, time from stimulus to answer, and whether the answer was correct or incorrect, along with the subjects ID number and other pertinent information. This portion of the experiment is shown in Figure 15.
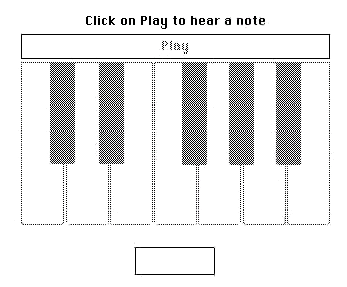
[7.6] In the second part of this experiment, subjects used the same interface to identify the perceived tonic in excerpts chosen from piano and chamber music literature. (This is not shown because the interface is the same.) In this portion of the experiment, subjects who had identified themselves as having RP were given a reference tone before each excerpt was played.
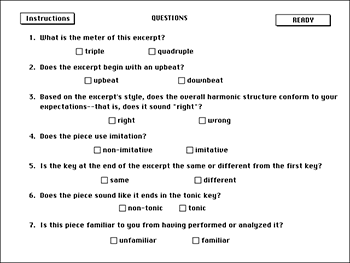
[7.7] Because we were not concerned about timing information in the next two experiments, we redesigned the interface for the pretest as an on-screen keyboard. The participant identified pitches by clicking on the keyboard. A button above the keyboard changed appropriately from “Play” to “Ready,” and a field above gave instructions. This interface is shown in Figure 16.
[7.8] Our experiments on tonal closure used recorded excerpts or short movements as stimuli. After each excerpt was played, the subject was asked to answer questions by clicking on check boxes on an answer form. In keeping with accepted methodology, the experimental questions were intermingled with other questions to conceal the hypothesis from the participants. The answer form for our latest experiment is shown in Figure 17. The participants were required to answer all questions.
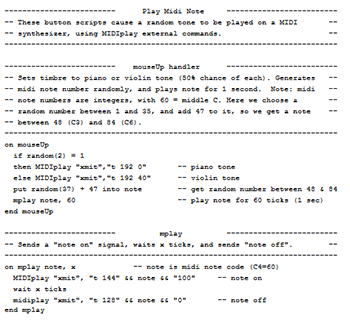
[7.9] We have used a variety of methods for presenting stimuli. The first two years we used a MIDI synthesizer controlled directly by MIDIplay to present the single-pitch stimuli and sequences of interference tones between trials. This was facilitated through MIDIplay’s “xmit” command, which makes it possible to send MIDI control signals to the synthesizer directly. (See Figure 18 for a simple example.) In our first experiment, we made digital recordings of the musical excerpts and played them as resources in stacks. By our second experiment, we had obtained a CD recorder, so we made a custom CD with each stimulus on a separate track. Individual tracks were easy to access through a simple Voyager commands, e.g., “CDplay1 5” to play the fifth track on the CD. In our third experiment, we used a CD to present all stimuli, including the pieces, isolated tones for the AP pretest, and multiple sequences of interference tones. Those that were produced by a synthesizer were recorded digitally directly from a Kurzweil PC 88 MX synthesizer, using SoundEdit 16. Thus, we did not have to deal with the idiosyncrasies of MIDI setup, and could run several subjects at a time on different computers, each with a separate copy of the CD.
|
Figure 17. Cognition Experiment: User Interface 3
(click to watch video) |
Figure 18. A MIDIplay Script
(click to watch video) |
[7.10] There is a great deal of programming behind these experiments. We spend some class time discussing problems and their solutions and demonstrating programming techniques, and feedback from the class is often helpful in refining the interface and presentation. Although details of the programming are beyond students without previous programming experience, all can benefit from a general knowledge of the problems that need to be overcome, and a print-out of all of the scripts used to implement the experiment is made available for any students who wish to study them.
8. STUDENT PROJECTS (TOC)
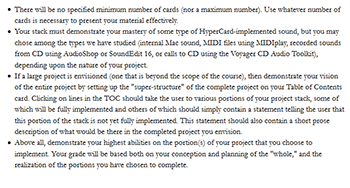
Figure 19. Final Project Guidelines
(click to enlarge)
[8.1] Each student is required to do a final project, which is the culmination of the semester’s work, and gives the students an opportunity to tie together many facets of the course. Students submit a proposed topic and rudimentary outline by about the middle of the semester, and in the last half of the course we minimize daily assignments so they can concentrate on this major undertaking. Our general guidelines for the student projects are shown in Figure 19. We make individual appointments with the students to review their progress, to give guidance and assistance when necessary, and to help solve programming problems in projects that require a scripting.
[8.2] Projects may be literature-based or tutorial, and may be designed for different audiences. Most of our students present college-level material, but a few have designed programs for younger children. Since projects are intended for in-class use only, we allow students to use commercial recordings and to scan art work from published sources, but warn them that if they ever want to seek publication or distribute their stacks to others, they will have to obtain permission from the copyright holders. We also insist on high standards of academic integrity—when material is used that is not their own, sources must be acknowledged.
[8.3] We conclude with samples of students’ final projects from our course. Space, downloading time, and copyright restrictions prohibit us from showing complete projects in this medium. We hope that the excerpts shown here will be sufficient to demonstrate the kinds of things our students are doing and the quality of their work. Most students designed projects that reflect their interests and major area of study.
Figure 20. Dorhout Title Page and Main Menu
(click to enlarge and see the rest)
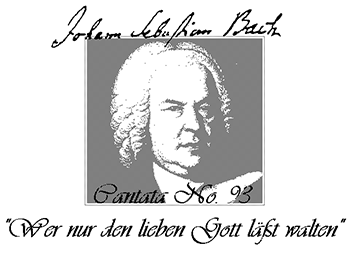
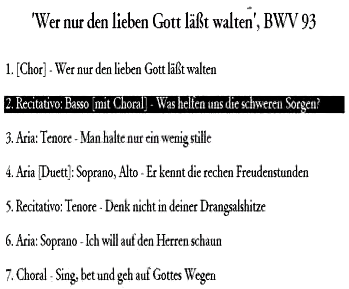
[8.4] Many of the projects, particularly those by performance majors, are literature-based. One example is a stack by Bret Dorhout, a D.M.A. student in organ performance, which presents information about Bach’s Cantata 93, “Wer nun den lieben Gott laesst Walten.” Figure 20 shows his title page and table of contents, which is linked to the various sections of the stack. Each card of the stack has the CD controls shown here; clicking on the picture of Bach in the lower right-hand corner returns the user to the table of contents. This student completed two major portions of the stack. Figure 21 shows part of the Text Translation section. Clicking on a line of text highlights the line and plays the musical setting. As the music continues, the highlight follows the text, and cards flip to the next section when necessary. Listening can be nonlinear—the user can click on any line, in German or English, to hear the setting of that text, or can listen to a whole section, or even the whole cantata straight through. Dorhout also implemented a View the Score section, a small portion of which is shown in Figure 22. The reduced score was created in Finale and copied into the stack. Then a transparent button was placed over each measure and, following an example from the Voyager CD Audio Toolkit, the stack was programmed so that clicking on any measure would play it, while “button effects” would show the listener which measure was playing. Dorhout enabled and disabled the buttons in sequence (disabling causes the them to turn gray and partially mask the music). He discovered that this results in a more aesthetically pleasing animation than the more common highlighting technique, which causes a white foreground on a black background. Again, the user can listen to the music continuously or jump around at will, and cards change automatically at the appropriate time.
|
Figure 21. Dorhout’s Text Translation (partial window)
(click to watch video) |
Figure 22. Dorhout’s “View the Score” (partial window)
(click to watch video) |

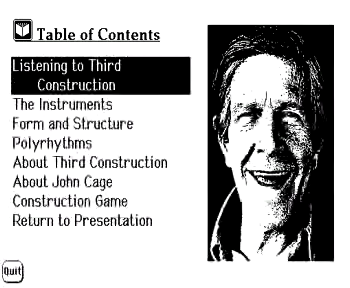
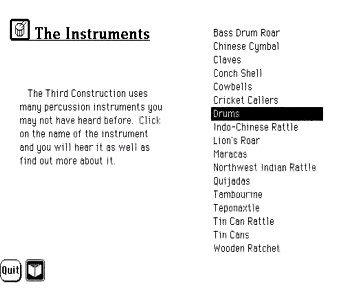
[8.5] Tom Toner, a D.M.A. percussion student, did his project on John Cage’s Third Construction. After an extended animated introduction (not shown due to downloading time), the table of contents appears. Toner used a Voyager technique—linking cards to the CD—to describe the percussion instruments and techniques heard as the piece plays, as shown in Figure 23. He also implemented a reference section on the percussion instruments used, with accompanying text, pictures, and sounds. Clicking on the pictures plays a recording of the instruments, which he played himself and recorded in his studio, then digitized for use in his project. The user can also hear an excerpt from Third Construction that shows the instrument in the context of the piece. (See Figure 24.)
|
Figure 23. Toner’s “Listening to Third Construction”
(click to watch video) |
Figure 24. Toner’s “The Instruments”
(click to watch video) |
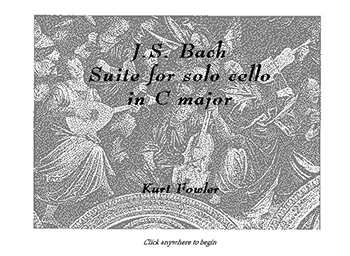
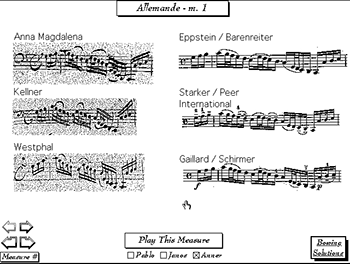
[8.6] Kurt Fowler, a D.M.A. student in cello performance, did a project on Bach Cello Suites. He was particularly interested in performance issues—contrasting editions and different bowing solutions. His attractive black and white stack is an excellent example of multilevel design. Since reduced-sized movies of this stack were not effective, we will show some highlights with screen shots. When the stack opens, a recording of a Bach Cello suite plays automatically as the title card appears on screen. Clicking on the title page takes the user to the main menu or table of contents. The design is consistent and very clean, with few visible buttons for navigation. The user moves to other sections or submenus by clicking on lines in the table of contents, and returns by clicking on pictures, which appear to be scanned images of wood-cut impressions. Figure 25 shows the title page and several of the submenus. Not all sections were completed during the course, but those that were are impressive and innovative. Figure 26 shows the first page of his “Bowing Solutions” section. The user can page through the movement one measure at a time or jump to any specified measure, and see scanned images of the measure from six different historical and modern editions. Clicking on the graphics brings up a full page of music from the selected edition so the measure can be seen in context. The user can compare three different performances by selecting a check box for Pablo Casals, Janos Starker, or Anner Bylsma and then clicking on Play This Measure. (Figure 26 also has QuickTime movies of the sound files for this measure.) We were able to accomplish this without swapping CDs by combining tracks from several commercial recordings on one custom-made CD, which was accessed using Voyager CD Audio Tool Kit. Fowler also implemented one movement of “View the Score” in a similar manner, with animated measure highlighting, check boxes to select the desired performance, and buttons to take the user to a scanned image of each different edition.
|
Figure 25. Fowler’s Stack
(click to enlarge and see the rest) |
Figure 26. Fowler’s “Bowing Solutions”
(click to enlarge and listen) |
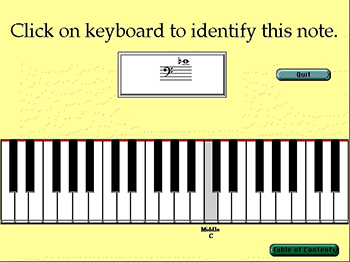
[8.7] We saw the opening of Jon Hynes’s project earlier in Figure 6. Hynes is a D.M.A. student in piano performance who plans to use this program in his private teaching studio after he finishes his degree. His students will be able to use the program to learn more about the piano, music history, composers, and piano literature, etc., while waiting for their lessons. Although the original program was in small-screen format and black and white, he has since redesigned it for a larger computer screen and added color, including many scanned images of instruments and composers. His main table of contents and some of the submenus are shown in Figure 27. In the sections on composers and instruments, clicking on the reduced picture next to the text takes the user to another card with a large full-color picture, so more detail can be seen. Last summer (1997), in an independent study class with Brinkman, he began work on the music reading and theory rudiments sections. He has designed an attractive on- screen keyboard, which can be modified through changing button, card, and background scripts to serve in many different capacities. In Figure 28, it is used for beginners to practice identifying notes, which appear in a field on the screen in random order. Students hear the notes when they click on the screen. They are given immediate feedback, and questions they miss are placed in a queue for later review. Students specify the clefs they want to practice, and the program records the students’ names, exercises performed, and scores in external files so the teacher can track their progress.
|
Figure 27. Hynes’s Stack
(click to enlarge and see the rest) |
Figure 28. Hynes’s Music Reading Drill
(click to enlarge) |
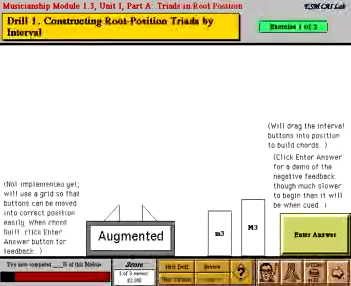
[8.8] Allison Weitzman, an undergraduate theory major, was taking courses in jazz theory and improvisation when she took our class, and designed a program for practicing jazz ear training. Her project, which is remarkably complete, used a custom-made CD for recorded examples and MIDIplay to control a synthesizer. Her program uses an attractive design with a scanned score on the title page. The menu is hidden, but programmed so that items appear when the mouse passes over them, and clicking on a menu item takes the user to the appropriate section. Music plays whenever the user returns to the title page (table of contents). Sections for practicing intervals, scales, modes, chords, and harmonic progression are implemented. The interface is shown in Figure 29 (we won’t take time to answer the questions). Users can customize each section by checking boxes to specify exactly what they want to practice. The Harmony section is most impressive. The user clicks on a button to hear a recording of one of the jazz greats playing a piece, then listens to a harmonic reduction of the chord progression synthesized on the MIDI keyboard. The object is to enter the correct chord symbols. The user selects answers from the bottom of the page, and then enters them by clicking on fields below the score. Clicking on any measure starts playing the MIDI file at that point. After the exercise is completed, it is graded and the user is given feedback. An example of this interface is shown in Figure 30.
|
Figure 29. Weitzman’s Jazz Ear-Training Program
(click to watch video) |
Figure 30. Weitzman’s Jazz Progressions Drill
(click to watch video) |
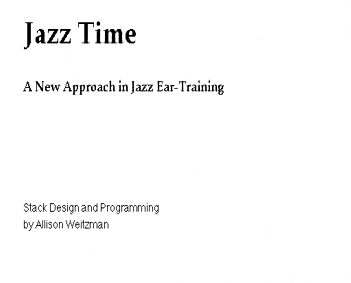
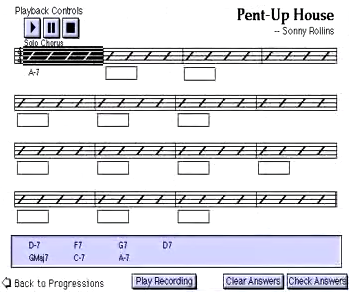
Figure 31. Campbell’s Stack
(click to enlarge and see the rest)
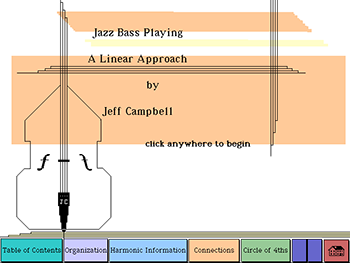
[8.9] Jeff Campbell, a jazz bass player who was recently hired on the Jazz and Contemporary Media faculty at Eastman, did another jazz project for our course. His stack is an excellent tutorial on jazz bass, which explains many of his improvisation concepts with musical examples in notation that can be heard on a CD that he recorded himself for the project. A few frames from his stack are shown in Figure 31.
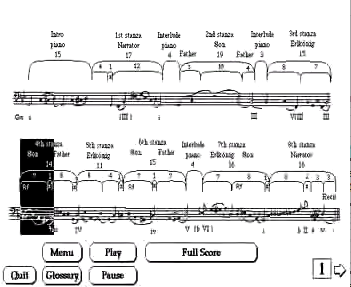
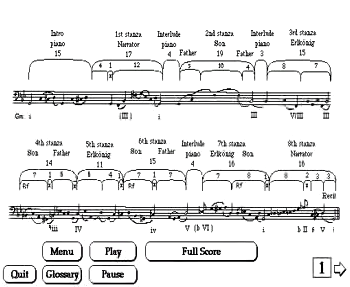
[8.10] Several projects have used multimedia techniques to good advantage for illustrating music-theoretical concepts. Valerie Errante, a D.M.A. voice student, did her project on Schubert’s Erlkoenig. In her discussion of musical structure, she modified Voyager’s measure-highlighting technique by placing buttons linked to the CD over a diagram of the song (from Brinkman’s class notes for sophomore theory). While listening to the song, the user can follow the tonal motion in a bass reduction as highlighted buttons show the location in the form diagram. Alternately, the user can click the mouse on any section to hear it. This is especially useful for comparing sections or for discussing Schubert’s musical characterization of the four cast members (narrator, father, son, and king). In Figure 32 we contrast the three statements of the refrain, “Mein Vater, mein Vater,” sung by the son. Errante also included a more detailed discussion of the formal structure—shown in Figure 33 without sound to save downloading time.
|
Figure 32. Errante’s Interactive Form Diagram
(click to watch video) |
Figure 33. Errante’s Tonal Discussion
(click to watch video) |
[8.11] A project on Schubert’s Nacht und Traeume by Jocelyn Neal, a Ph.D. theory student, also contains a good deal of analytic information. Figure 34 shows her animated demonstration of a common-tone modulation. In another section, she linked Carl Schachter’s analytic reduction of the song to the CD. While the song plays, an arrow moves across the screen to make a direct visual connection between the recording and the graph. Another button produces more information about the graph. (See Figure 35.)
|
Figure 34. Neal’s Common-Tone Modulation
(click to watch video) |
Figure 35. Neal’s Sketch Presentation
(click to watch video) |
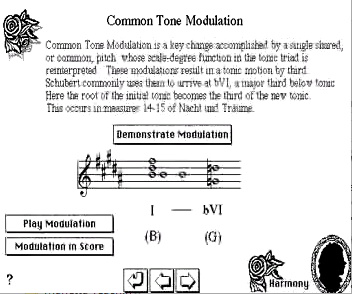
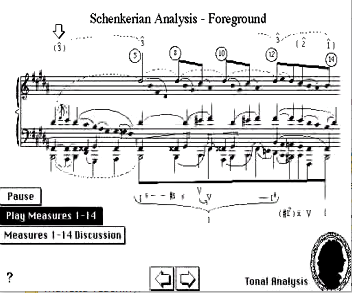
Figure 36. Crumbley’s Speedwork Animation
(click to watch video)
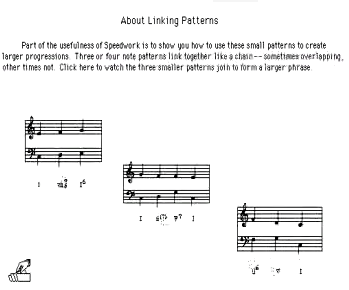
[8.12] Stefanie Crumbley, a Ph.D. theory student, did a project related to her teaching in our Freshman theory course. Her work was based on drills that Neil Minturn, our Freshman theory coordinator at the time, called “Speedwork.” In these exercises, students learned basic patterns in tonal music, e.g., tonic expansions through arpeggiation or use of passing chords, and were required to recognize them and apply them in practical situations quickly and fluently, i.e., to assimilate them and make them part of their musical “vocabulary.” Crumbley’s project showed many of these patterns in reduction with MIDI realizations, quizzed the students in their usage, and illustrated them in excerpts from Haydn symphonies. Figure 36 shows an animation used by Crumbley to demonstrate how these basic patterns can be combined into a larger context. The year after completing our course, Crumbley—who was by then teaching the third year of our undergraduate theory sequence—used HyperCard to write an excellent tutorial on atonal theory that was used in the course.
[8.13] We will show one stack from the abbreviated summer course we taught last July. For the Summer Session course, we provided a set of template stacks so that students could get a quick start in the one-week intensive program. Daphne Leong, a Ph.D. student in our theory program, did a tutorial on Bartok’s String Quartet No. 5. The opening sequence of her stack is shown as Figure 37. For visual unity she used a scanned image of a Kandinsky painting in the opening sequence, and then used enlarged portions of this painting as backgrounds in other sections of her project. Figure 38 shows screen shots of sections from her stack. In the form section, the items in the form chart are linked to a commercial CD so that clicking on an item plays that section of the piece. In the Listening section, she placed scanned images of the score on cards, which also contained a description of the action and a form diagram. The cards change in synchrony with the music, and the highlighted button on form chart moves to show which section is playing.
|
Figure 37. Leong’s Opening Sequence (half-size)
(click to watch video) |
Figure 38. Leong’s Stack
(click to enlarge and see the rest) |
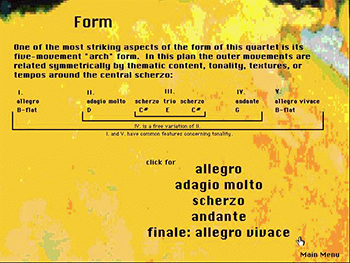
Figure 39. Clevenger’s Feedback (half size)
(click to watch video)
[8.15] In Figure 39 we show an animation designed by John Clevenger for humorous feedback in a theory tutorial. In this instance, the student is spelling chords while a graphic representation is built on screen. If the student’s answer is wrong, a dinosaur foot crushes the graphic, and “Godzilla” invites the student to try again. This animation was created with AddMotion.
[8.16] In closing, we should state that, while these are good examples of final projects from our course, they are not atypical. We are constantly amazed by what our students accomplish in a one-semester introduction to multimedia programming, and it was difficult deciding which of some forty projects that our students have done during the last three years we should show here. Also, as we had hoped, several students have used these tools in their own teaching at Eastman and elsewhere.
9. FUTURE DIRECTIONS (TOC)
[9.1] The course has been extremely popular with students in the theory department and in other disciplines. Although we have an official cap of 10 students, the course has been over-enrolled each semester it has been offered. Last spring (1997) we had 18 students in the class, and turned several more away. Support for the course has also improved a great deal. In Spring of 1996, James Undercofler, the Acting Director of the Eastman School of Music, allocated funds from an unrestricted donation to Eastman to begin a Multimedia Development Center. This enabled us to purchase a much more powerful computer to use as a teaching station, and to add a color scanner, a CD recorder, and other peripherals. Part way through the spring 1997 semester, we moved the course into a new, well-equipped computer lab. The lab was equipped through a National Science Foundation grant obtained by Dave Headlam and Mark Bocko, a University of Rochester electrical engineer, for creating an interdisciplinary computer lab dedicated to computer use for course-related work. We are currently in the process of reevaluating the course content, and we will probably move from HyperCard to Macromedia Director this spring. This change, whenever we make it, will involve major reworking of teaching materials, but much of what we have learned will be applicable in different programming environments. In our course evaluations, many students have commented that the music- cognition part of the course is too much in too little time—they would prefer to have a separate course for that area and expand the emphasis on programming (scripting) in the present course. Thus we are considering moving the music cognition component to a separate course. This would also allow us to incorporate a unit on developing multimedia for the web in the current course.
[9.2] There are probably as many styles of co-teaching a course as there are co-teaching teams. We have viewed this course as an equal partnership from the start. The course utilizes the individual and collective expertise of both authors: Brinkman’s long experience in computer programming with music applications, and Marvin’s work in music-cognition research and statistics. We planned the course initially in many brain-storming sessions, and share teaching duties in almost every class. After each class we have a “post-mortem” session in which we critique the class—what worked and what didn’t—and make notes on things to improve the next time around. We keep our planning notes and critiques on the computer for easy reference and review the next time we teach the course. At this session we also set objectives for the next class, plan the order of presentation, divide up preparation tasks, and when necessary, review and revise plans for the next few classes. Many assignments are graded together. When this is impossible due to time constraints, we divide up the work and then meet to review our individual work and discuss grades. Teacher comments are saved to a text file on student disks for each graded assignment, which we either write together or review jointly before returning to students.
[9.3] Teaching this course, even as a shared effort, has taken a tremendous commitment of time and energy. The time required for class preparation, solving technical problems, grading assignments, designing and implementing experiments, and working with students on individual projects has been far greater than that required for any other course either of has taught previously. But the experience has also been a rewarding one, both in terms of our personal an professional development. We have presented papers on the course at the annual conferences of two professional societies (including SMT Baton Rouge), and at a public forum on Technology in Music Education at the opening ceremony of for the 75 anniversary of the founding of the Eastman school. We have presented papers on our work in music-cognition at four national and international cognition conferences. Our review of CD-ROM software is forthcoming in Journal of Music Theory Pedagogy, and we are preparing articles on the cognition experiments for submission to appropriate journals. Finally, as a result of this work, the Eastman School was nominated last spring for a Smithsonian-Computer World Award for technical innovation in education, and information on our work is included in the permanent collection at the Smithsonian and is available on their web site <http://innovate.si.edu>.
Alexander R. Brinkman
Eastman School of Music
26 Gibbs Street
Rochester, NY 14604
aleck@theory.esm.rochester.edu
Elizabeth W. Marvin
Eastman School of Music
26 Gibbs Street
Rochester, NY 14604
betsy@theory.esm.rochester.edu
Works Cited
Beekman, George. 1996. HyperCard 2.3 in a Hurry: The Fast Track to Multimedia. Belmont: Wadsworth Publishing Co.
Brinkman, Alexander R. and Elizabeth W. Marvin. 1996. “CD-ROMs, HyperCard, and the Theory Curriculum: A Retrospective Review.” Journal of Music Theory Pedagogy 10 (in press).
Butler, David. 1992. The Musician’s Guide to Perception and Cognition. NY: Schirmer Books.
Cozby, Paul C. 1993. Methods in Behavioral Research, 5th ed. Mountain View, CA: Mayfield Publishing Co.
Desberg, Peter. 1994. Hyper InterActive CAI: Using HyperCard to Develop Computer-Assisted Instruction. Boston: Allyn and Bacon.
Goodman, Danny. 1993. The Complete HyperCard 2.2 Handbook, 4th ed. New York: Random House Electronic Publishing.
Ray, William J., and Richard Ravissa. 1998. Methods toward a Science of Behavior and Experience, 3rd ed. Belmont: Wadsworth Publishing Co.
Schachter, Carl. 1983. “Motive and Text in Four Schubert Songs,” in Aspects of Schenkerian Theory, edited by David Beach. New Haven and London: Yale University Press, 61–76.
Winkler, Dan, Scot Kamins, and Jeanne Devoto. 1994. HyperTalk 2.2: The Book, 2nd ed. NY: Random House Electronic Publishing.
Copyright Statement
Copyright © 1997 by the Society for Music Theory. All rights reserved.
[1] Copyrights for individual items published in Music Theory Online (MTO) are held by their authors. Items appearing in MTO may be saved and stored in electronic or paper form, and may be shared among individuals for purposes of scholarly research or discussion, but may not be republished in any form, electronic or print, without prior, written permission from the author(s), and advance notification of the editors of MTO.
[2] Any redistributed form of items published in MTO must include the following information in a form appropriate to the medium in which the items are to appear:
This item appeared in Music Theory Online in Volume 3, Issue 5 in September 1997. It was authored by Alexander R. Brinkman (aleck@theory.esm.rochester.edu) and Elizabeth W. Marvin (betsy@theory.esm.rochester.edu), with whose written permission it is reprinted here.
[3] Libraries may archive issues of MTO in electronic or paper form for public access so long as each issue is stored in its entirety, and no access fee is charged. Exceptions to these requirements must be approved in writing by the editors of MTO, who will act in accordance with the decisions of the Society for Music Theory.
This document and all portions thereof are protected by U.S. and international copyright laws. Material contained herein may be copied and/or distributed for research purposes only.

Prepared by Jon Koriagin and Tahirih Motazedian, Editorial Assistants